You know I really wish I had documented the entire process of the van build. I wish I took more pictures and I wish that I wrote more things down. But I didn’t. I guess part of me didn’t want to be bothered. To be fair I was working full time and building out the van. Which is an accomplishment in and of itself.
I guess I didn’t want to feel like some sort of poser. I mean search DIY van build and you can find a plethora of videos. I had nothing to add. But just like after a trip, I kind of feel like I cheated myself if I didn’t document anything at all.
But enough of the sulking already. I didn’t write about when I was actually doing it. So the next best thing I can do is write about it now.
So we’ll go step by step and get together any photos that I have.
The first thing that had to be done was a deep clean of the van. I pulled up the plastic floor cover and took apart the partition near the cab of the van. This step was actually pretty difficult because the bolts were in some hard-to-reach places. I was trying to loosen factory set bolts using nothing but pliers and a wrench.
There was some rust on the van floor so I scraped that out using a metal wire brush. After that, it was just a matter of cleaning the van with a hose and some all-purpose cleaner.
I got some white spray paint and painted the entire interior. Gave it a fresh start. The paint is supposed to be rust-resistant so it was sort of a precautionary measure. This part was not fun at all. The space is not very large so it becomes a bit difficult to breathe after a bit with all the fumes. I had glasses and a mask on but still, it got pretty bad in there.
And it just sucks being crouched down in the van spray painting the walls. Pressing the button. It puts your body in some awkward positions. A couple of coats and we were good to go. This took about two days.
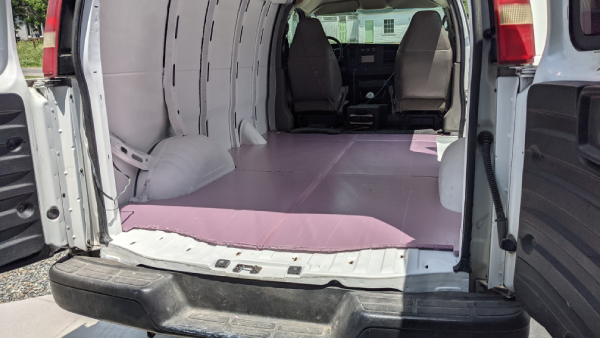
From there it was time to start insulating the floor. I got these stiff foam boards and used cardboard beforehand to determine the sizes of all the pieces I needed to cut. For the most part, this portion of the build went smoothly. The foam pieces fit fairly well and we were ready to cut out the plywood floor after that to create a sturdier subfloor.
It was great because I was able to use the cardboard cutouts to cut the plywood as well. The wood was obviously much harder to cut but for the most part, there wasn’t much trouble. The boards fit fairly well. Not as snug as the insulation but the smalls cracks were filled with caulk and it was just fine.
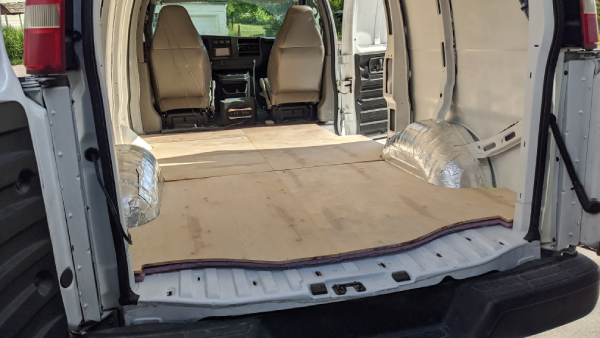
I used some Great Stuff foam to fill in any larger cracks, especially near the wheel wells and one area by the side door. The stuff was awfully messy. I learned to use it over time but the first attempt was kind of chaotic. It was the best material to use to fill up larger gaps in my opinion.
Time to insulate the van walls and ceiling. I cut out cardboard to mirror the shape of the different portions of the wall just like with the floor. Each cutout was a different shape because the ribs of the van created different sized partitions.
I used really good quality insulation from 3M called Thinsulate. Keeping warm in the cold was one of my main goals because I wanted to use the van during the ski season. It was super easy to cut too. I only had to use a fabric cutter and it was easily shaped into whatever I needed. One of the main advantages of spending the money too.
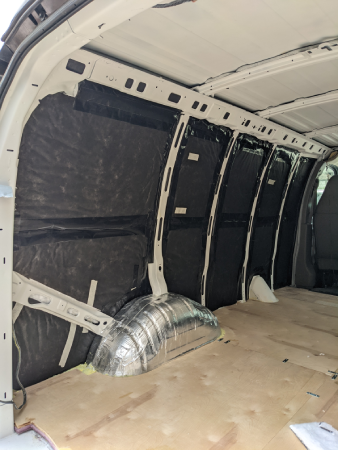
It is almost like a fabric material itself. On one side is a black fiber material and the rest of the insulation is made up of this cotton-like fiber.
To install, I used the same spray adhesive that I used to put the floors down. This stuff is strong. I really had no trouble with installation to be honest. Most people complain that the insulation part of the build is a pain but mine was relatively pleasant. I used duct tape to connect all the different pieces of insulation together.
There are small empty spaces contained inside the ribs of the van so I cut strips of insulation and stuffed them inside. I also opened the side and back door panels and fit pieces of insulation where they would fit. I tried my best to get as much surface area covered as possible.