After figuring out what the electrical system was going to look like it was time to build the furniture. I had three pieces to build: the cabinet that would house the electrical system and the stove, the water cabinet that would hold the water tank and sink, and the bed platform which would also double as a storage area for clothes and other personal items.
The first order of business was making measurements. I already had most of the items that would be contained in the furniture (battery and electrical equipment, water tank, propane tank, etc.). So that was helpful in figuring out the dimensions of the different pieces and compartments.
But I also wanted to make sure that I had enough open space in the van. I wanted some extra room so I could sit and move around without it feeling cramped. So I wanted to make sure the pieces weren’t too large.
Once I had a good plan figured out it was time to buy the wood. I will say, it was more expensive than I was expecting. The price of wood has skyrocketed (along with other building materials) over the previous year. A piece of plywood was two or three times more expensive than it had been before the pandemic. But what are you going to do?
I used smaller, thinner wood to build the frames and it was fairly easy to cut the pieces and put them together. I built rectangles to frame the sides and then connected the two ends, building platforms and shelves with more framing wood in between as needed.
The water cabinet frame was a bit easier to put together. No shelves needed in that one. The other cabinet (the one that houses the stove and electrical system ) was more complicated to build. There would be four different compartments and I had to take into account the dimensions of each of them.
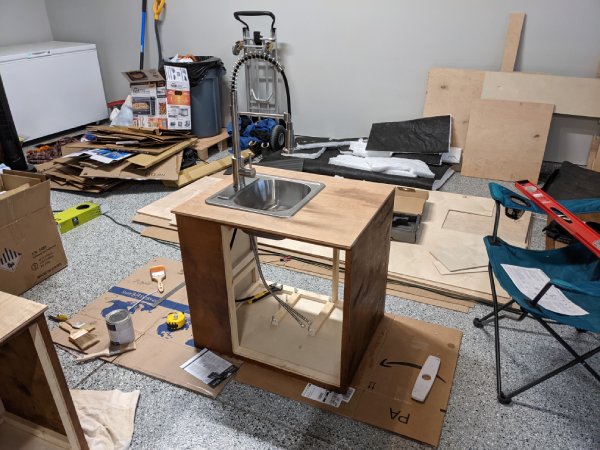
There is also protrusion on the floor/wall behind the driver’s seat (which is where the gas tank connects to the wall of the van) that had to be taken into account. So I couldn’t build a rectangular piece of furniture. I had to include some empty space in the back of the cabinet so it would slide up against the wall.
Once the frames were complete I had to cut the plywood to cover the sides. Cutting wood in straight lines was more difficult than I expected. Especially when you have to cut for four or five feet. Sometimes I am a bit of a perfectionist (it comes on in some moments) and I was tested when I cut a piece a bit lopsided. My goal was to cut it a bit larger than needed because I knew I could sand it down into the correct shape once connected to the frame.
Once the pieces were cut it was time to condition the wood, stain it, and then finish it. That took a couple of days because the different pieces needed multiple coats. And it took several hours for each coat to dry. I picked a golden oak color stain and I think it was a good choice.
The wood finish was the most difficult to apply. It came in cans of heavy, glue-like liquid and it had a strong chemical smell to it. One coat and the garage smelt so terrible. And it would linger for days. But I needed to apply it to ensure the wood would be able to stand up to the moisture.
Once the wood was finished I connected the pieces to the frame. I used a combination of wood glue and screws to connect them. Sanding the edges down so they would fit nicely along the edges was tough work. I had a small electrical sander and I really wish I had a larger, stronger one.
The sawdust got all over the place. It was a bit irritating. Especially when it came time to clean up the garage. The dust got into every nook and cranny it seemed.
With the sidings connected I was ready to install the shelving and the doors. I had never installed a door before but I think it came out just fine. I mean they are functional and serve their purpose. Even if they might be a little lop-sided (but only if you look real close).
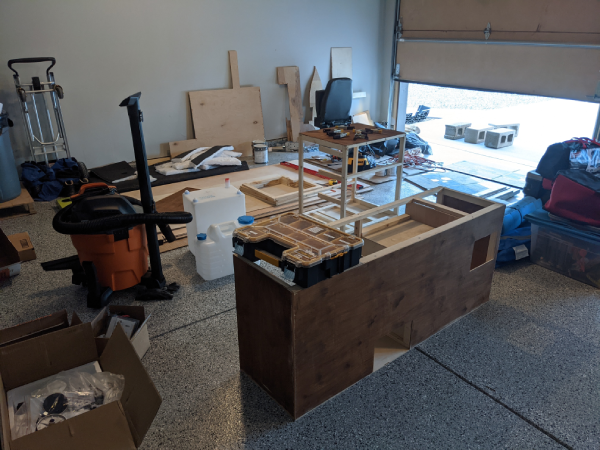
Now that the two cabinets were finished up it was time to build the bed platform/storage unit. I had to get this done before installing the other units. Or else I would never be able to fit in the van.
This was by far the most difficult part of the furniture build. I couldn’t construct it in a perfect rectangle because the ribs of the van wouldn’t allow me to. They jut out from the sides so I had to compensate for that.
And since the platform would function as a kind of chest I had to connect a large piece of half-inch plywood on hinges. That way I could swing it open and access the inside when needed. This was a bit more difficult than the doors I installed on the cabinets. There were a lot of considerations. This piece would serve as my sleeping platform so I had to ensure it was level and could support all the weight.
I was a bit concerned when I tried to install it because it was very difficult to fit it in through the van door. I was worried that I had not measured correctly and built it too large. I had to try it multiple different ways but eventually, it fit.